Products (Excel)
A list of products of a company
Introduction
This is a guide to creating a recipe for a small table of products. The aim of the guide is to illustrate the process of setting up an Excel recipe in Documotor. Here's the document that we'll recreate.

The template table.
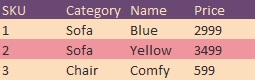
The resulting table.
What will I learn?
After following this guide, you'll be able to:
- Create a new Excel recipe.
- Add data to an Excel recipe.
- Create dynamic tables.
- Insert data into an Excel template.
- Format the cell colors in an Excel template.
Prerequisites
You'll need access to a Documotor tenant, and it's assumed you've built your first recipe. The approach in Excel is similar to the setup of Word and PowerPoint recipes. However, for the time being, the bindings still need to be created manually, that is, inside Excel, rather than in Documotor's UI.
Navigate the UI
Just like for the previous recipes, start by navigating to a folder of your own choosing, select New Recipe > Recipe, and then the Excel (.xlsx) type to indicate it's an Excel recipe, name it "Employees" and open it. Currently, the Excel templates still open in the old version of the UI. Navigation is very similar to the current one, and the folder structure is unchanged, only the view is different. You might need to find your new recipe again under Templates, and open it from there.
Sample data and template
Here is the data that we'll use to populate the sample template:
{
  "headerColors":
  {
      "backgroundColor":"694873",
      "foregroundColor":"FCDDBC"
  },
  "products": [
    {
      "category": "Sofa",
      "SKU": 1,
      "name": "Blue",
      "price": 2999,
      "rowColor":
        {
            "backgroundColor":"FCDDBC",
            "foregroundColor":"352C30"
        }
    },
    {
      "category": "Sofa",
      "SKU": 2,
      "name": "Yellow",
      "price": 3499,
      "rowColor":
        {
            "backgroundColor":"EF959D",
            "foregroundColor":"352C30"
        }
    },
    {
      "category": "Chair",
      "SKU": 3,
      "name": "Comfy",
      "price": 599,
      "rowColor":
        {
            "backgroundColor":"FCDDBC",
            "foregroundColor":"352C30"
        }
    }
  ]
}
Copy it, navigate to the Sample Data tab, paste it and Save data.
Download the sample template and you're ready to start working on bindings.
Bindings
The binding insertion in Excel is a slightly different process than in Word and PowerPoint. For one, the new editor doesn't support Excel templates yet, so the insertion is done exclusively in Microsoft Excel. Additionally, the bindings are not inserted into Content controls like in Word nor directly into text, section names or alt text like in PowerPoint. Rather, they are inserted into comments to Named Ranges.
By the time we're done, this template will contain all the bindings that are supported in Excel: Format, Repeat and Field.
- The Repeat binding will ensure one row per product is added to the table.
- The Field bindings will insert the values into the table.
- The Format binding will set the colors of the table.
We'll start by inserting a binding that sets the cell and text colors in the header of the table.
- Open the downloaded template.
- Select the header of the table.
- Use the Search bar to open the Name Manager.
- Select New to create a new named range.
- Set a Name for the range to make it easy to identify, even among many other ranges.
- Add a binding to the Comment. The formatting is stored in the
headerColorsproperty, so the correct binding is{"BindingType": "Format", "BindingKey": "headerColors"}. - Confirm that the Refers to: range is the correct range of the header.
- Press OK.
- Close the Name Manager.
Adding a Format binding to the header.
All bindings in Excel are inserted in this way.
The next binding to insert should be Repeat, since that one needs to set the scope for the Format and Field bindings that will be placed inside the table rows.
- Select the row of the table following the header.
- Follow steps 3-5 of the previous process where you inserted the Format binding.
- Instead of the Format binding, insert the Repeat binding into the Comment:
{"BindingType": "Repeat", "BindingKey": "products"}. - Select OK.
- Close the Name Manager.
In Excel, the Repeat binding inserts one instance of the marked range for each element of the argument array, in this case, products. Each instance is inserted into the row below the last one. Furthermore, the Repeat binding simplifies insertion of further bindings into the inserted rows by setting the scope to the nth element of the argument array.
Meaning, when we insert Field bindings, we'll specify the data field to be inserted by providing the path to the property from the element of the array. Once we're inside a Repeat binding with argument products, the binding {"BindingType":"Field", "BindingKey":"category"} will insert the category name - we don't need to specify the products array anymore.
Follow the same process as above to insert the Field bindings for SKU, Category, Name and Price. At any point, you can upload the template and generate a preview to track your progress. To upload, navigate to the Template tab, select Replace Document and upload the template. Then, navigate to the Preview tab and select Regenerate Preview to ensure you're looking at the latest version of the template.
To complete the template, you'll also need to add a Format binding to the row of the table following the header. The process is exactly the same as earlier, with one important distinction: the name of the Format binding now has to be alphabetically behind the name of Repeat binding.
This is because bindings are parsed first by length of the range that they cover, and then alphabetically. In this case, the Repeat binding needs to be parsed before the Format binding, since the Format binding cannot find the range otherwise. This doesn't matter if the range of the Format binding is strictly smaller than the range of the Repeat binding.
When applying Format, Field and Repeat bindings to the same range, the name of the Repeat binding needs to be first alphabetically.
Result
All in all, you were supposed to have added two Format bindings, one Repeat and four Fields. The finished template should look like this. If that looks right, congrats! You just cooked up your first Excel recipe.

The Name Manager containing all the necessary bindings.
Updated about 1 year ago